Another display shelf for Curiosities

Yippee!!!  I finally got rid of all the crates being used as shelves INSIDE by booth at Curiosities!  It really defines AND refines the space!

P1070362It’s impossible to get any further away to take a better photo of this inside wall.  The ‘just added’ shelf is the one on the right.  It was previously a display piece at Stars, and was painted grey.  A quick re-paint and it was ready to go.  I know it looks a ‘little off’ with the individual shelves not being the same distance apart, and being different heights.  It didn’t even occur to me to ‘make them match each other’!  But I also didn’t really PLAN to use them ‘side by side’.  As you know, I change up my booth arrangements quite often.  this’ll so for now.

P1070363I added lots more white Ironstone pieces, pitchers and creamers . . .

P1070369A new friend for the upcycled owl.

P1070378
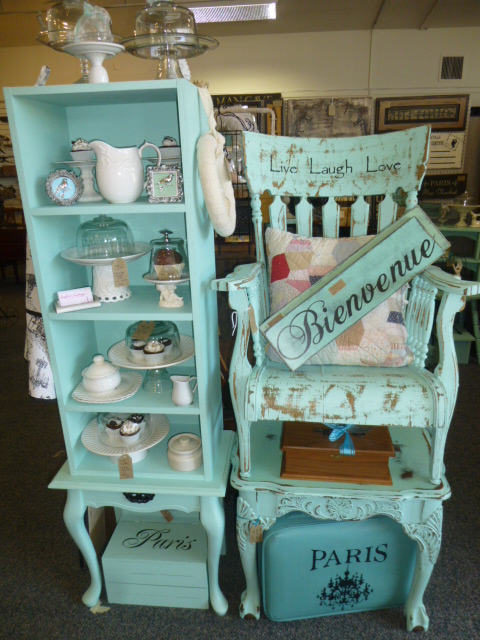
Lots more room ‘in general’ for displaying ‘smalls’ with the 2 newly added shelves.

P1070372A new BIG Eiffel Tower bottle to go with the smaller one I already had.

P1070375Room for these framed pieces on the shelves.

P1070373Starting to add little items under the cloches.

P1070365Arranged several similar black finials and 2 of the three wire cloches that I have in stock on TOP of the taller shelf.

P1070376I packaged up several of the repro skeleton keys that I use to embellish things with.  Travis said shoppers kept asking if they could  ‘take the key off’ to buy just the key.  “here’s your sign!”  LISTEN to your customers!  Many of my BEST ideas have evolved from customer requests!

P1070374Some smallish magnetic memo boards WITH magnets!

P1070384How FUN is this polka-dotted pitcher?!?!?  It really doesn’t ‘go with’ anything else I have in my booth, but I just loved it!  Hopefully someone else will fall in love with it!  Wouldn’t it be sweet filled with yellow daisies?

P1070351Brought in this smallish galvanized bucket.  Everyone loves buckets!  Especially ole beat up ones!

P1070361I rearranged the display at the BACK of the booth a bit.

P1070359That area is really the first thing shoppers notice once they walk past the entrance.  I hand’t realized that it looked ‘a little sloppy’ before, until I looked at my last batch of pictures!

P1070380Cream and white ceramic flower pots.

The new vintage clothing room at Curiosities will be opening soon!  I got to sneak a peek at the decorating progress yesterday and it is going to be FABULOUS!!!   It’s not just ‘old clothes on hangers’!  They are artfully and creatively displayed.  It will remind you of playing dress up in mom’s closet when you were a kid!  I’ll announce the date of the grand opening as soon as I know it!

HOW hot is it?!?!?

It’s so HOT that I just burned my hand opening the car door!!  And it’s not even the ‘hottest part of the day’ YET?!?!  Ack!!!  I though I was going to work outside, painting sign boards today.  101 degrees is just too much for me to work in, even in the shade!

Not only is it early in the day to be getting this hot already, it’s quite early in the SUMMER for us to get this hot here in the Pacific Northwest.  We had a string of 90-100 degree days the end of June; then it cooled off a bit for 4th of July week.  Used to be that it never got this hot until August, and only for maybe 3 days.  sigh.  If I wanted this kind of heat, I’d move back to California!  Thank God for air conditioning and popsicles!

I am finally getting more display shelves painted and in place in my booth at Curiosities.

7.13.13 Both + finds 157Took these 2 shelf units in a couple of weeks ago.  The bases are from an old display at Stars; an end table cut in half.  Michael added some 2×2’s for back legs and I painted them to match the shelves.  Raising the ‘plain ole box shelves’ up one legs really dresses them up nicely, AND is quite practical.

7.13.13 Both + finds 158

You  want to get your displayed items as close to eye level as possible.  Stuff that you put on the bottom shelves typically does not sell very well. (so be sure to ROTATE it to higher shelves!)   With the pretty curved legs of these shelf bases, the product under the shelves is nicely ‘framed’ and more noticeable than if it was just a bottom shelf.

7.13.13 Both + finds 163By putting the taller shelves on the outer corners, and lower items beside helps draw the eye to the center . . . welcoming shoppers to ‘come inside’.

7.13.13 Both + finds 157You also want to ‘be aware’ of what your booth entry is ‘framing’.  What items it draws your eye to at the back of your booth.  I don’t ALWAYS remember to display with that in mind.  Looking at pictures helps me notice things like that which may go unnoticed when I ma there in person.  It’s a continual process!  As soon as something sells, everything has to be rearranged!

7.13.13 Both + finds 188THIS inward facing display is my nest ‘target’.  I want to get rid of the crates for shelves on the INSIDE to the booth; and this is the last  of them.

7.13.13 Both + finds 164I will continue to use the crate shelf system on this outer facing wall where I predominately have primitives on display.  Not sure how long I’ll continue to stock the primitive stuff.  Really depends upon how well it sells!  

7.5.13 curiosities only 024I’m not entirely ‘sold’ on how the transition from primitive to cottage works at this corner.  But then I also don’t have any BETTER ideas right now.  So, I’ll just ‘let it ride’ for a while as I focus on the inside of my booth; then see how I feel about it then!

P1070151Last week I got rid of SOME of the crates inside the booth; replacing them with this shelf.  will be adding another shelf this week.  These are ‘raised’ up off the floor and sitting on a bench to get the product closer to eye level.

P1070128Reconfigured the outer crate wall a bit to incorporate the crates I took from the inside.  I KNOW I have too much stuff sitting on the floor in this display!  And NONE of it has sold!  But I can’t stand bare spots in my display.  So, I just occasionally rotate it to higher shelves!

P1070130

Took in some more cow pitchers and creamers.

P1070148Pretty stoneware with gold rim bowl and pitcher set.

P1070162Little nests with eggs.

P1070152MORE white pitchers and creamers.

P1070154Altered pickle jar and a gallon jar filled with blue and aqua spools and balls of thread.  Cat topped cloches and cat creamer.

P1070157A couple of upcycled cloches.

P1070135Upcycled bird finials (the ‘how I did it’ post coming soon!)

P1070136Several bags of rag balls and thread cones and spools to use as jar or bowl fillers.

Little crate shelf

7.4.13 CUR + projects dresser 060This is the tall skinny crate shelf I bought recently.  Not the kind of thing I’d usually buy.  But this one had the shelves divided into different size sections; so I thought it would make a nice piece to display a group of collectibles in.

7.13.13 Both + finds 193But FIRST it needed to be painted.  I used my ‘new blue’; which is a little more BLUE and Green on the Aqua scale.

P1070101And here it is, all filled with goodies in my space at Stars.  Priced at $27.oo.

P1070104I decided to paint the BACK of it too.  While it CAN be hung on the wall, I seldom have ROOM on the walls in my booth to hang shelves amongst the multitude of signs.  With the back painted, I can use it in places where the back SHOWS; without it looking like the ‘bare back’ of something.  You COULD even hand something from the back if you wanted to!


Vintage plant shelf

2.2.13 stars Michael etsy 062Found this guy at Stars a couple of months ago. 

2.2.13 stars Michael etsy 064It appears to have originally had a gold finish; was then overpainted a flat black, which had cracked and shed away in spots.  VERY primitive looking!

2.2.13 stars Michael etsy 063But since I’m not particularily into primirives anymore, it was dentined for a make over.  The price was right that I could afford to ‘splurge’ on some good spray paint to spruce it up.

2.2.13 stars Michael etsy 068I had left it sit out in the rain for a few weeks to get nice and clean and ‘work off’ a bit more of the loose paint.  Then I went over it with a stiff brush to remove the last of the loose paint.

2.2.13 stars Michael etsy 069A quick coat of spray primer to be sure it down’t crack and peel more, then 2 good coats of soft turquoise and it’s ready to do duty in a beach house or cottage.

2.2.13 stars Michael etsy 073Next project is this rustic wood firkin I found at a thrift store.  I HAD a label that has since peeled away, leaving remnants of glue and the edge.  Not sure yet HOW I want to approach this one yet.

The wire shelf will be going to Stars of Curiosities in the near future.

To distress or NOT to distress? THAT is the question.

Decided to add a carved wood applique to this little shelf to ‘oomph’ it up a tad.

This is the one that I selected.  Glued it on with some tacky glue; and set a couple of heavy books on top to hold it down firmly while the glue dried.

As I was spray painting the added piece, the over-spray pretty much covered up all the distressing I had done previously.

So I just decided to ‘leave well enough alone’ and did not RE-distress it.  Figure if the purchaser WANTS distressed, they can easily do so themselves.  BUT if someone were looking for a NON distressed piece, it’s less likely they’d buy a distressed piece and repaint it.    Is there ANY logic to that thinking?!?!

Primitive plant stand updated to shabby chic

The before  photo wouldn’t upload for some reason???  It was a dark mahogany color originally.  A bit more of a modern style that I usually go for, but simple enough lines that just a paint job could transform it to a shabby cottage look.

I did a little bit of prep sanding (orbital sander), two coats of paint then sanded again to distress; for which I also use my orbital sander.

  I use my orbital sander for distressing because it’s faster and easier.  (especially with my bad back!)  But if you don’t have an electric sander, you can distress by hand using a COARSE sanding sponge. 

Why coarse and why a sanding sponge?  Coarse because it works FASTER!  And a sanding sponge  because it’s easier to manuever and handle than a piece if sand paper. 

 The sanding sponges can be a bit pricey (like $3.00 each!) if you go to a big home repair store and buy a single one.  Look for the big bundles of them to go on sale and stock up.  You’ll save in the long run if you do a lot of hand sanding.

I also just found some in a 2 pack at Dollar Tree!!!  And they are every bit as good as the more expensive ones!  You never know how long an item will stay in stock at dollar stores, so again, I suggest stocking up while they have them available.

I just delivered this little stand to Stars yesterday; along with the striped end table and chair.

Bedroom decorating progress report

I left off awaiting the building of a work table and pondering the head-board.  Here’s how the work table turned out:

THIS was the perfect spot for the work table since we had to leave open space for the heat/air vent.  Why is that one corner rounded?  Because I am a KLUTZ and would surely bump into a pointed corner while trying to access my craft supplies in the closet!

The legs came from a rummage sale.  The rest of the table was built using reclaimed plywood.

After a bit of sanding, it was ready to be painted.  I just ‘used what I had’; a non matching (to the legs) off white.

Two coats of paint.  A good sanding so some of the wood showed through.  A QUICK dose (wipe on and immediately wipe off!) of a medium stain.  Let the stain dry/cure overnight.  Then two good coats of matte varnish.

Perfect fit!  Well, of course the table fit perfectly between the dresser and the wall because Michael built it specifically for that spot.  The white shelf on top of the table was one left over from our space in Camas.  I dragged it out of storage to use ‘temporarily’ until Michael gets my big storage cabinet built later on.  Then I discovered it fit right at the end of the table!

Kitty Spike supervises, and highly approves of the comfy new bedspread!

These old shoe boxes that I covered with torn book pages fit perfectly on the shelf!!  The ‘labels’ were on the ends of the boxes, so I’ll have to make new ones for the side that now faces front.  And my big spools of lace fit right in there too!

Wanted to see if I could fit my globe collection in the room to add a pinch of color.  Most of them are tan/cream; a few are the typical water blue; which would be the perfect touch of color.  But I’m not sure they will all fit.  Will have to reconsider them when I get closer to being finished with the room.

The spot on the table just in front of the shelf is a perfect place for my paper cutter!  Now that I can leave it out, I’ll use it a lot more.

Might make this big vintage frame into a bulletin/memo board???

And IF I do, need to decide if I should ‘leave it as is’ or paint it to match the room????

Got my new box labels done; and took the globes off the top shelf.

Yes, I really DO have that much glitter!!  Some of it is really OLD stuff leftover from my childhood!

Big gallon size vintage canning jars filled with shells have replace the globes on the top of the shelf for now.  I use those shells for lots of craft projects, but I also like to SEE them.  This is better than in a box in the closet at least!

Finding a night stand that will FIT in the small amount of space I have it going to be a REAL challenge!  For now I have a little stool with a doily on top.  And that is about as much room as I have!  We HAD (as in it has long since SOLD!) the perfect little white stool a while back.  sigh


See the taller stool in between the other two?  That would have been perfect!  Oh well, something else will come along!

We’ll look at the headboard and window treatment next time.

Good design . . . wrong color!

We made these little ‘bun foot’ shelves clear back when we still had our own shop.  This ‘granny green’ (as I call it!) color was pretty popular back then, so I used it quite a lot.

 The green worked well with pink, so I used it with the pink quite often.  Alas, the green shelves have just never sold.  Time for a make over!

I knew I wanted to paint them my signature beachy blue, but pondered whether they needed a little more OOMPH???

Finally decided to do a WIDE stripe like I’d done on the big dresser, so that they could work together.

And here they are, in my space at Stars; sitting atop my inspiration piece, the big dresser.

I can totally see these selling together and the shelves being used as bedside stands.


In case you’ve forgotten how I made those cute little bun feet, (or if you just haven’t been reading my blog for that long!)  click here to see the original post and what I used for the bun feet.  Of course you can BUY ready made, unfinished bun feet at a big box home and garden store; but they’ll cost you and arm and a leg!  Mine are very ‘budget friendly’!

Just restocked (STACKED!) at Stars

After a very busy sale weekend at Stars, I pulled the few remaining white pieces to make room for all my new beachy blue stuff.

It’s a tight fit, but I did manage to fit quite a bit of the newly painted beachy blue stuff into the space by doing some serious stacking!  There’s the half round coffee table I recently showed you, on the bottom of the stack.  Topped with several benches, a little corner shelf and a small storage shelf with a drawer.  ALL of these items were constructed by us using reclaimed wood.

Enough space under the coffee table for a basket of your favorite magazines.

Little cabinet with drawer.  White wire basket sold separately.

Assorted benches.  And a big vintage wood ‘trencher’ bowl filled with old architectural elements.

Little corner shelf for extra storage on the bathroom vanity perhaps?

And little black lamps with ‘skeleton’ shades.  Just LOVE these!!!

LOTS more stacked up on the right hand side of our booth!  A gate leg and a drop leaf table topped with small tables and chairs.

Vintage grubby little step ladder that I painted beachy blue, makes a great ‘catch all’ or plant stand.

Atop the beachy blue drop leaf table, a small pedestal table with carved base, a medium sized occasional table with a little step stool underneath.

A vintage cake dome /cloche fits perfectly on the little table!

This is the repurposed bar stool table shown recently.

And a little vintage child’s chair with a bird cage on it on top of that!


Behind the aqua drop leaf table is a gate leg table (covered with old book pages) and THIS stuff is stacked on top of the gate leg.  An aqua child’s chair and shabby little bench.

And an aqua end table under the bench.   Kind of hard to get a good photo of some of this stuff because it IS so jam packed in there!

A regular size chair next to the child size one.

TO  BE  CONTINUED  TOMORROW . . .

Repaired and updated curio shelf

I come across old curio shelves like this quite often.  This one is missing the ‘decorative top piece’ (you can see where it’s supposed to be); which most likely had one of those wonderful country heart cut outs in the center.

Michael cut a new top piece and attached it for me.  If this one HAD still had the heart cut out top piece still in place, we would have just attached this plain one right over the top of it to hide the heart.

While the PLAIN top piece was just fine, and could have been left as it was; I decided to add a pretty wood applique.  I’ve also added decorative stamp designs on that top piece in the past.  Now it’s ready to paint!

My signature ‘beachy blue’ paint was my choice for this piece.

Close up of the wood applique.  Won’t this shelf look great filled with a collection of little white cream pitchers?!?

This, and the rest of the ‘beachy blue’ stuff I’ve been working on lately will be going to Stars by the end of this week.  If you’ve been thinking about buying some of the WHITE stuff, get it NOW; because I’ll be pulling it to make room for the blue stuff.