Well, what is supposed to be the dining room is finally done. AND I actually have some kitchen counter space to work on now!
 Yep, that IS my ‘dining room’; which is actually my ‘office’. The computer desk and shelf in the corner were in my bedroom at the old place. The tables under the window are old booth displays from Stars; a dining table and coffee table that I cut in half. The ‘other halves’ of each piece are in my craft room. The pile of clothes in the far left is actually my coat tree, which is right behind the front door.
 The newly created kitchen counter work space was made possible by adding this aqua step-back cupboard that Michael custom built for me.
 It was designed as somewhat of an’extension’ of the kitchen. I’m not particularly fond of how I’ve got the toaster on top of the bread box, but for the sake of counter space and lack of cupboard space, it’s a necessity.
 Before Michael built the cupboard for me, ALL my kitchen counter space was taken up from the microwave, toaster and bread box. I had that small white shelf in this spot with my canisters on it. My cake stand collection was on one of the shelves in the living room.
 My ‘secondary’ collection for ironstone pitchers is on the top of the step-back. These are the unique ones that don’t match the rest of my collection; which is on a shelf in the living room still.
 And this is the kitchen. Cozy, eh?? The left of the sink here is where the microwave and toaster were before, and the newly created counter work space, which is slightly bigger than the space to the right of the sink.
 LOVE my red butter bell!!! I have never seen them in colors like this, so I had to keep this one. I stock and sell a lot of these in my booth at Stars, but they are always white; occasionally I find them with thin blue stripes around the rim.
 These are the cupboards above the sink side of the kitchen, and these two little cupboards are the only space I have for pantry food storage.
 I painted this thrifted wire shelf white to store my dish towels and cloths on; as there was no drawer or cupboard space for them.
 Two very narrow cupboards on either side of the stove for baking pans.
 Two more very narrow cupboards above the stove for spices, oils, coffee, etc.
 Counter space to the right of the stove.
 And to the left of the stove, just enough room to display my prized vintage turquoise Kitchen Aid mixer.
Soooooooooooooo . . . . .two cupboards above the sink for food, two small ones above the stove for spices etc; drawers for silverware, utensils, skillets, plastic wrap and foil, oven mitts and vitamins; two cupboards beside the stove for pans . . . . . .and that fills ALL the built in kitchen cupboards!! WHERE do I put my dishes?!?!?!
 I was actually prepared for this dilemma in advance and placed my two big shutter cupboards ‘back to back’ at the entry space to the dining room; dividing the kitchen and living room. The white one faces the living room and is used for ‘office stuff’.
 The turquoise one faces the kitchen, on the right of the stove and stores my dishes. I have a LOT of dishes!

Most of the dishes are thrift finds; and I kind of had collections of three different sets started.
 The turquoise glasses and wine glasses I found at Dollar Tree!!
 The first style I started collecting are these, and I was hoping to find enough of all pieces to make them the dishes I use all the time. Alas, they have been harder to find than I had hoped.
 But these vintage Johnson Bros. English Ironstone dishes that I had also started collecting also have become easier to find. So now I am working on making these my regular dishes.
 A few assorted ‘odd balls’, just because I like them; like these lion’s head ramekins that match some soup lion’s head soup bowls; some vintage and some found new at Ross.
 Some vintage oval platters and boats; and more vintage ramekins.
And that’s the kitchen and ‘dining room’ in my new place.
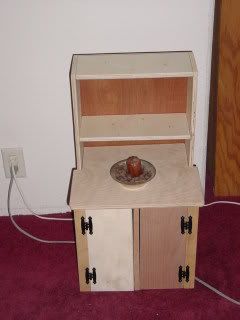
 Unfinished wood, so just a good dusting and it’ll be ready to paint.
 Oops! Okay, maybe a little bit of sanding inside the doors before I paint it.
 The knobs are easily removable too. This will be a quick make-over!
 A couple of quick coats of my ‘new blue’ paint, and a little bit of hand sanding. I re-used the original knobs ‘as is’ since I didn’t have any others that were small enough, and they suited the new look just fine.
 It has been taken to my booth at Stars, along with LOTS more ‘new blue’ items.
 LOVE this color combination!


