Hippity – hoppity . . . Easter’s on it’s way!

We had an amazing break in our winter weather last week that made me SO ready for Spring!  Our winter weather arrived late (February!) but hit HARD; as did my cabin fever.  Putting out the Spring and Easter product in my booths at Stars has really got me in the mood for ‘play outside weather’.

P1380305

Since I’ve got the beach decor in my big booth, I put the Spring/Easter product in my wall space.  (Pardon that red bucket in the left corner.  It’s an OLD building and occasionally the roof leaks.)

P1380356

Some cute vintage chicks and bunnies.  Ostrich sized faux eggs covered with vintage buttons.   Milk glass is great for using with your spring decor!

Vintage bell jars with hand shredded vintage book page ‘grass’ and gold leaf eggs.

P1380311

~::~

P1380312

~::~

P1380313

~::~

Custom blend of pink and gold paper shred to go with the packaged gold leaf and pink little eggs in the pink basket on the right.  Turquoise glitter eggs too.

More unique eggs for your spring display.  These are covered with ‘Paris’ themed paper.

P1380317

Hand stitched felt eggs, embellished with vintage buttons and baby rick rack.

Gallon size mercantile jars filled with moss, nests and eggs.  Smaller jars with straw and eggs.  Big vase with nest and eggs under black wire cloche.

Cute mini take out boxes in Spring colors are perfect for filling with sweets to give to your friends at Easter Brunch.  Decorative faux cupcakes.

P1380304

Plenty of cake and cupcake stands.  These are so versatile for use in your seasonal tablescapes for adding height and dimension.

P1380323

Upcycled journals.

Reproduction vintage style chicks from an estate sale.  I gave them lace crowns and nestled them into some cozy nests.

P1380352

Hand painted faux eggs in turquoise ceramic pots and buckets.

LOTS of new frames, big and small, just stocked.

P1380385

LOVE this reproduction Gothic arched window pane.  I’m still on the fence about selling it.  It just might come home with me on my next trip!

P1380371

Vintage white shutter with handcrafted twiggy wreath.

Youth size white rocking chair.  Vintage wash bowl and pitcher.

One of a kind little upcycled suitcase end table with ‘hairpin’ metal legs.

P1380294

Black occasional tables.  The bottom one is distressed oak, the top one with  the scalloped apron and curvy legs is a satin finish.  Will be removing all the darker furniture in the not too distant future; replacing it with lighter colors for Spring and Summer.

Not quite matching pair of vintage canning jar lamps.  The jars are the same size but different brands.  The shades are the same color, but slightly different shapes.  Each sold separately; $29.00.

P1380383

Vintage jewelry box with seashell motif paper.

Assorted crates and carriers; perfect for use with your spring decor.

P1380278

Stars is open seven days a week; 11am – 6pm.


Stocked and spruced up and ready for the Summer Sidewalk SALE at STARS!!

Stars BIG ‘Summer Sidewalk Sale’ starts Friday, August 31st and runs through Monday, September 3rd; Labor Day.

This is really one of the BEST sales of the year at Stars.  LOTS of vendors bring in ADDITIONAL inventory to set up on the sidewalk outside.  Don’t miss this sale!!

BOTH of my booths are stocked to the hilt; and as always, everything in my booths is 50% off during the sale.  Last chance to purchase my beach decor items from my wall space.  After the sale I will be converting the space to Fall decor.

I have added a few little ‘hints of fall’ to both booths . . .  just to get you in the mood for fall.  (Not that anyone needs to be enticed to ‘think fall’ after the record HOT summer we’ve had!)

Lots of vintage hobnail milk glass vases and dishes added recently; as well as regular and gold rimmed milk glass.

Vintage and upcycled beach decor.  Big surag starfish, painted white and glittered.  Little jars filled with tiny seashells or pretty beach glass.  Shells mounted on wood posts and jars.  Candle lanterns and lamps.  And of course, Mermaid crowns!!

Vintage picnic baskets, bar stool, ‘breakfast in bed’ tray, wreaths, cubby shelves, trugs and wall decor.

And that is just my little wall space!  On to my 10’x10′ booth!

No such thing as ‘too much’ when it comes to my booth!!
Vintage Fire King gold rimmed milk glass dishes and vintage Ironstone dishes are restocked and always plentiful.

Both Stars Mall are open 7 days a week, 11am – 6pm.

White furniture binge

Went on a bit of a white furniture painting binge recently.  Here’s the end result of said binge.

Cute little metal birdcage.  Just a quick coat of white spray paint.

Little brown step stool.  Painted white and distressed.  Still debating whether or not I should stencil something on it???

Not a very good picture of the refinished piece on this one.  (sorry!)  Just a basic white paint job and distressed.

Cute three tier wall shelf; again just painted white and distressed.

This half round table was the same dark wood color as the shelf above.

This little shelf was already white.  I just distressed it.

This coffee table with lower shelf had already been repainted white, but they didn’t do a very good job of it.  You can’t really tell how ‘streaky’ the paint was in the pictures.  I needed to sand it before repainting it anyhow; and decided that I liked how it looked without repainting!  Distressing covers a multitude of mistakes!

Little ‘jewelry box size’ chest.  Removed the knobs, sanded off the red, white and blue; painted it white, distressed it and put the repainted knobs back on.  easy peasey.

Little upcycled side table made using a tall metal candle stand and an inverted metal tray.  Glued together using e6000, and spray painted.

This ‘open back’ cubby shelf was a medium wood color.  The white paint and distressing really emphasized the dental moulding at the top.  Below it, in the second photo is another cubby shelf, but with a back.  It was already white, so I just distressed it a bit.

I guess this shelf was for some kind of sports memorabilia.  Some white paint and you have just a regular white wall shelf!


No before picture for this one.  It was dark brown and had a ‘tapestry-like’ cover on the seat.  I LOVE the foot stools that open up like this for storage space!  Painted it white and distressed it a little.  Added some additional padding to the seat before I recovered it with a pretty soft aqua paisley print fabric.

All of these went to my booth at Stars.  A few have already sold.

So, what’s next???  I’ve got some pretty BIG news!  A new shop is opening soon in Aurora . . . and they will be carrying some of my items!  Stay tuned for more details and official Grand Opening notice!


Changing things up a bit

Not quite two weeks in, and I’ve already rearranged my new wall space.

P1350513This is how I had it set up originally.  I absolutely LOVE using a ladder, opened up and filled with product; but I really NEED to sell that ladder.  So I decided to re-work the space and lean the ladder, folded, against the wall; making it easier for someone to purchase.

P1350593

This is how it looks after the rearrange.  I added the black metal table on the far left, and the vintage metal bar stool.  Everything else was just moved a little.

Side by side comparison.  To compensate for the loss of the vertical display space on the ladder, I hung a few things on the wall at the top of the space.

P1350594Galvanized cubby shelf and canisters.  Little metal ‘file basket’ set on its side with stack of grubby books and electric candle.

P1350603

Close up of display on top of cubby shelf.  Those little baby food jars contain some moss and hand painted tiny faux bird eggs.

P1350595

Wall space just above the cubby shelf, a wire basket hung on its side to function as a shelf.  Vintage repro tin tiles that I upcycled into memo boards, a bundle of grubby books and a couple of old whisk brooms in a small tin flower bucket on the ‘shelf’.  The little wash board ‘memo board’ has clothespins backed with magnets to hold memos.

P1350596

A couple more baskets hung to use as shelves above the burlap curtains.

Perfectly grubby industrial style vintage metal stool.

P1350600

I was HOPING to have enough room to open up this little step-ladder.  That didn’t happen, but I was able to move it closer to the front where it’s more visible and accessible to shoppers.

P1350601

With the ladder folded up, it’s more difficult to display items on it.  This metal basket tucked into the ladder just perfectly!  Tight enough to not fall out, but loose enough to easily remove.  It was a perfect spot for some garden signs.  The rusty wire baskets I had, fit nicely in the two rungs below this.  Rolls of chicken wire filled one.

P1350602

A trug on top of a trug.

P1350604

Trying to make the various trugs more visible, moving them to the front edge of the space.

P1350605Here you can better see the other baskets on the ladder rungs.  Big rusty and metal urn, stacked with assorted other vintage buckets and baskets.

And a few new things in my big booth!

A NEW Vintage book page craft! PAPER FEATHER TUTORIAL

Well, it’s new to ME.  I’ve been seeing the paper feathers made from vintage sheet music and book pages on Pinterest for a while now.  Initially they didn’t really appeal to me; but I decided to try my hand at a few to see how difficult they were to make . . . .  and BAM!!  I’m hooked!  I love them and I really enjoy making them.

P1350148My biggest issue with all the ones I was seeing on Pinterest was coming up with something sturdier than just wire for the stems.  Bamboo skewers worked perfectly.  I made the smaller size feathers using the regular size skewers, and some bigger square-shaped ones (closer to chop-stick diameter) for the bigger ones that I made.

I used several different kinds and colors of book pages.  The yellowed sheet music shown above and some varying shades of white dictionary and book pages.

SUPPLY LIST:

Paper: old book pages, sheet music, dictionary pages or ANY other paper

Bamboo skewers for the stems

Thinned down tacky glue: for gluing the two layers of paper to the stem.  Add just enough water to your tacky glue that it’s easily brushed on with a paint brush.

Scissors for cutting out the leaf shapes and feathering.

Mod Podge: apply one coat to each side of your feather shape BEFORE cutting your slits.

As with just about any crafting I do, I prefer to work in an assembly line style.  I selected the vintage papers that I wanted to work with and readied the rest of my supplies.

  1. Fold paper in half so you get two matching pieces of each leaf shape that you cut.
  2. With your thinned tacky glue, evenly coat one side of a leaf and put glue down the center only of the matching leaf.
  3. Place your skewer in the center of the fully glued leaf, and lay the other leaf on top.  Gently press along the skewer with your fingers to get the glue to grab it; and smooth the edges to be sure they are completely glued together.
  4. Set aside for several hours for the glue to completely dry and cure.  (overnight is best)  Your paper will curl a bit from the moisture in the glue, but you WANT that to happen.  It gives them a more natural feel.

P1350146

5. Vintage paper can be very brittle.  I ruined several of mine just handling them and gluing them together.  To strengthen your final product, apply a coat of matte finish Mod Podge to each side; one side at a time.

P1350147

Mod podge dries pretty fast, adds a little more ‘character curls’ to your paper and will help your feathers last a lot longer.  The mod podge gives the paper a bit of a plastic coated feel.  If you aren’t sure if you will like the look and feel of the added Mod Podge, just do ONE feather with it as a test, and one without it; to see which you like best.  A little bit of the Mod Podge is going to seep over to the other side of the feather, so be sure you lay them to dry on something ‘raised’.  Across an open box or on a cookie cooling rack.

6.  Gather up your dried feathers and grab your scissors.

P1350160

Go through your entire batch of them making your first ‘V’ cuts; 3-5 cuts per side, depending upon the size of the feather.  I always keep the total number of cuts as odd number.  IE 3 on one side and 4 on the other.  These cuts are going to be the GUIDES for your smaller cuts, so be sure you make the cuts in the direction that you are going to want ALL your cuts to go.

P1350159

7. After you have made those cuts in your entire batch, go back and do the feathering cuts on all of them.  Make your cuts as close together as you can, and cut as close to the stem as you can.

Here are the different kinds of paper/ shapes and sizes that I made.

As you may have guessed from the above pictures, they can become quite addicting to make!!

NOW, I just have to figure out how to use them and display them to sell in my booth at Stars!  Suggestions are welcome!

My booth at Stars Antique Mall

I know I’ve been posting a LOT about the upcoming Rebel Junk Marketplace in Hillsboro, Oregon; and seemingly doing nothing BUT prepare for the show.  But I have still been adding new inventory to my booth at Stars every week, as I always do.  Here’s a little peek at some of the recent additions:

P1340612

LOVE these little Valentine gift ‘bags’ that I upcycled.

I’m really not certain if ‘gift bags’ is the right thing to call them.  They are more like little ‘boxes’ made out of lightweight cardboard.  I have no idea what I originally intended to do with them when I bought them; or even when or where I bought them in the first place.  But they were in my Valentine supply box and I decided it was time to ‘use them or lose (donate) them’.  I’m in serious paring down mode so that I don’t need to rent a storage unit anymore.

In the top left picture you can see what they originally looked like.  I only covered them with the old dictionary page on 3 sides.  (trying to keep it a ‘quick and easy’ project!)  Then I glued a strip of pink ribbon along the top and tied it in a knot.  Then I added some little scrapbook embellishments . . . just whatever I had on hand.  I was going to add a piece of tissue paper to give them some ‘oomph’ and keep them looking nicely fluffed up; but thought I see if paper doilies would work.  Just the perfect little extra touch.  These are available in my booth at Stars for $1.00 each.

These red cones were leftover Christmas trees from LONG ago.  (I think clear back when we had our shop!)  I had filled them with cello bags of wrapped candies in the past and added a chenille handle.  I had a package of ‘hearts on a stick’ and put two in each cone along with some paper shred (I ‘blend’ my own paper shred) then tied on a tag that I printed with some bakers twine.  The tag reads “Forever, for always and no matter what.”  I only had three of these, so I displayed them on the little black wire shelf along with the little gift bags.

P1340607

I had bought some of these ‘honeycomb’ hearts a while back to use for display, but decided to go ahead and sell them this year.  I opened up one of them, and left the other two ‘flattened’ for easier transport.

P1340540

For some reason I had the ‘lid only’ of this old heart shaped box.  I added some embellishments and made it into a wall hanging.  The ‘arrow’ on the box was made from the one extra ‘heart on a stick’ leftover from the cones.  (there were 7 hearts in a package) I glued some cardboard on for the tip of the arrow and glittered it to match the heart end.  Used some leftover red Christmas ribbon to glue all around the edge of the box and tied it into a bow at the top.

Then I tied on a little ‘True Love” tag, which I printed myself; with baker’s twine.  really trying to keep my upcycles ‘simple and quick’ so I can price them lower; so they will hopefully SELL faster!

A couple of upcycled mini Valentine themed mini mannequins.

Vintage Ironstone bunny covered casserole dish, and an English gravy boat with attached liner.  I especially like the ones that have the liners attached like this one does.

Some ‘Love Potion No.9’ upcycled bottles.

Some cool newly found hobnail Milk Glass containers.  (and a few more that I am taking in tomorrow!  I’ve been finding a lot of the hobnail Milk Glass lately.)

Upcycled jar lantern with tea stained lace and rusty tin heart.  A big ole tub of letters to spell out just about anything your heart desires!

Upcycled apothecary jars and vintage and upcycled medicine bottles.

PLENTY of hand stitched and stuffed felt hearts still.  (there will be some of each of these colors/styles at the Rebel Junk Market too!)

Stars in open 7 days a week; 11am – 6pm.

My new favorite color

P1340518

I’m really drawn to galvanized metal items and soft grey colors these days.  I especially LOVE the contrast of mixing them in with shabby chic white decor.  I’ll be bringing LOTS of items in this color to the upcoming Rebel Junk Vintage Market on February 2&3.

In addition to the ‘real thing’ (all of those items are already packed away for the show) I’ll have lots of faux painted items, like the ones shown above.

 I’ve also got some distressed turquoise metal items, shown above.  For some reason, I decided to buy some dark turquoise spray paint a while back; and I painted these items with it.  Did not like it once they were painted though, so they have just sat in storage.  Got them out and was going to sand them to prep them for repainting, but decided that I actually LIKED the distressed dark turquoise!

These items and much MORE will be available for purchase at the

Rebel Junk Marketplace

Come visit my booth, and don’t forget to ASK for your 20% discount.  Discount given ONLY to those who have read about the show via my blog and/or Facebook page; and only if you ask.  My booth only.


SNEAK PEEK at Rebel Junk show inventory

Much of the inventory for this upcoming show has been packed away for months already.  As I previously mentioned, I’ve been saving my very BEST finds for this show.  Of course, whatever doesn’t sell at the show will end up in my booth at Stars and the upcoming Every Husband’s Nightmare Spring show in April.

These pictures aren’t very good.  It’s kind of dark in my storage space.  But you can see a little bit of what I’ve stashed away for the show.

These pictures are of some of the items that were in my booth at Stars for a while, that I pulled to save for the show.

P1340421

And of course, I’ve been working on lots more stuff specifically for this show; like these two upcycled mannequins.

This is what I started with:  a child size plastic ‘half’ mannequin (the back was ‘open’), a fabric covered male mannequin torso, and a big wood candle pedestal. (Why yes, the candle pedestal photo IS upside down!  Glue was drying on the bottom, so I had it upside down and I was afraid if I waited to take the picture that I’d forget!)

On the male torso, I covered the whole thing with several layers of vintage pattern pieces.  Sanded the pedestal to distress it; painted and distressed a round wood finial to put on top.

The same treatment on the child size plastic mannequin; except that I cut a piece of cardboard to cover the open back before I started adding the vintage pattern pieces.  At first I made a little pleated skirt out of pattern pieces for her; bit it looked too plain.

I made another ruffled skirt (using a needle and thread) and layered it on top of the pleated skirt, and fluffed it all out.  MUCH better!  I added a little key necklace that hangs right next to her ‘heart’.  (how lucky was it that there was a heart pocket template in one of the patterns I had!?!?)

ALL THIS and much MUCH more in my booth at the Rebel Junk Show, February 2-3.

Spend less time waiting in line to buy your admission ticket, and more time SHOPPING by buying your ticket on-line here in advance.

I finally have a sofa in my living room!!

Well, I have a sofa ‘of sorts’.  A daybed that will function as my sofa and that I can sleep on when I have overnight guests (whom I would of course give my room to!)  And it only took me 14 months from the time I moved in to ‘build’ it.

I really. REALLY wanted to find  a cool old day bed to use in my living room.

Something along the lines of these.  Aren’t they fabulous!?!?  Alas, I have not seen one single vintage day bed since I moved 14 months ago.  And actually, had I found one like the iron ones in the above photos, they probably would have been to short to actually SLEEP on.

I already had this old door that I had painted to use as my headboard previously in my room at Michael’s.  It ended up being too long to use as the headboard in my room here, so I just stashed it in the garage until I figured out what to do with it.

P1280731

So, a few weeks ago, an elderly gentleman who lives across the street from me came over while I was outside working on some projects, and introduced himself to me and commented on how I was ‘always out here working on something’!  He said he had an old door and peg rack that he was getting rid of, and asked if I’d like them.  Of course I said yes.  This is that door, and it is HEAVY.  It took both of us to lift it onto my wheely cart and wheel it over to my place!

Wasn’t sure WHAT I was going to do with it at first.  Michael has been working on some home improvements, and I thought he might be able to use it; so I offered it to him first.  He did not need it, so it was mine . . . all mine to figure out a use for.

P1280732

So I had the old panel door for the backing.  Could use the newly acquired ‘heavy’ door for the base.  Now I just needed to figure out what to do for legs????  But I wasn’t sure that ‘just legs’ would be sturdy enough, and I wanted to leave room for storage underneath, so I wanted it a bit HIGHER than a typical daybed would be.  So I designed the above wood boxes to use as the base to put the door across, and Michael custom built them for me.

I had even saved the wood support boards that we had used to attach the panel door to the wall when I was using it as my headboard previously.  I just screwed the boards back on using the same screws in the same holes; then screwed the door to the wall.  Most of the weight of the door is supported by the boards. Screwing it to the wall just keeps it from falling over.

P1280737
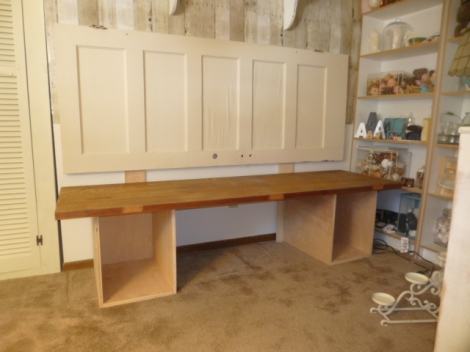
And there you have a ‘naked’ make-do daybed!!  Now I just need a mattress or some kind of padding!!  Which proved to be much more difficult than I had anticipated!!  A twin mattress was too wide and not long enough.  So I  headed to Joann Fabrics (50% off coupon in hand!) and figured I could get a new foam pad at a decent price.  WRONG!!!  Even at HALF off, the foam pads were crazy expensive!!!  Forget that!  So I put on my thinking cap and started looking elsewhere.

Since we are nearing the end of summer, I thought perhaps I could find a box pad like the ones above (but for outdoor furniture) on sale.  Nope.  They were more expensive than the foam pads!  An actual twin mattress would have been the cheapest option IF it would have fit!  sigh.  WHAT am I going to use for the ‘cushions’ on my sofa/daybed????

P1280738

My propensity to think outside the box led me to purchasing TWO king size foam mattress pads.  I cut each one into THREE equal pieces; which gave me a nice and cushy SIX layers to sit or sleep on!!  I bought a plastic twin bed cover to ‘hold the foam layers together.

0d1f74cb50e00ebf1c2e2cba63f8fd91

I was really envisioning something that looked like this.  I LOVE the old pallets for the base, but NEED the storage room that a covered base provides.  But a cover similar to the one above might still look good with a skirted base.

But this is what I got . . .  for now at least.  The covering and pillows are temporary.  I just threw what I had on there for now.  I want to make a skirt (burlap maybe) and a vintage chenille bedspread and different covers for the pillows (feed-sack style maybe?) .  Oh, and now that I see it ‘almost finished’, I’ve decided that it NEEDS arms or SOMETHING on the ends.

I would LOVE to find some cool vintage corbels to use as ‘arms’.  They wouldn’t really need to go the full depth of the bed; just enough to keep the pillows from falling off.  And if I can’t find any old corbels, I can buy news ones, or maybe MAKE my own!  (I foresee a field trip to the salvage place down in Aurora!)

p1210354

So, the daybed is still very much ‘a work in progress’.  As is the living room as a whole.  I had to figure out where to move the dresser that was on the wall where the daybed is now.  (it’s full of craft supplies!)

p1210348

And I’m totally embarrassed to admit that I have yet to do away with all of this ‘pile of stuff’ at the back of my living room.  Although this is a picture from a year ago, and the pile is now about 1/4 that size.  A lot of it was product for Stars that has been taken to my booth and sold. Getting rid of this will open up the living room a bit more, but only in a ‘long and narrow’ way; not any wider.  And now that I’ve decided that I NEED to do the Junk Salvation show again in February; I’m going to have to start accumulating product for it.  I’ve resigned myself to the fact that I’m just going to have to upgrade to a bigger rented storage unit.  I have a 4’x6′ right now.

P1280741

These old suitcases that I have as the coffee table for now are too big for the space.  I actually have a really cute shabby white trio of tables that I had Michael build for me (before I even moved) that I had intended to use as the coffee table.

 While I was awaiting a sofa to put a coffee table in front of, I had put them on my front porch.  Remember my blue pumpkin display from last fall?  The two smaller ones ‘tuck under’ the bigger one.  These will eventually replace the suitcases as my coffee table.

So, the ball is rolling and I just MIGHT have my living room squared away enough to actually put up a Christmas tree this year.

UPcycled 3 drawer chest

DRAT!!!  I could have SWORN that I took a picture of this ‘nasty’ three drawer chest before I started working on it!?!  Alas, apparently I did not; but from the looks of these drawers, I think you can imagine what it looked like.

P1270071

Layers of old paint colors, mismatched drawer pulls . . .

P1270070

Contact paper on the top?!?!?  (I REALLY should have looked at this more closely and with my glasses ON; before I decided to buy it!)  Fortunately, said contact paper was SO old that it was really BRITTLE, and scraped off with a paint scraper fairly easily.

P1270069

And MORE contact paper was covering this mess on one side!!  That ‘indent’ is far too big to just fill with wood putty.  Time to get creative.  (Just in case you are wondering WHERE that indent came from; this piece must have been the side drawers from a desk.  And this is the side the desk top and drawer was attached to.)

P1270137

The repair in progress.  I found a ‘strip’ of wood that was almost the right size; then filled the rest of the gaps with bits and pieces of bamboo skewers.  Sanded all that smooth, then filled any remaining gaps with wood putty.

P1270135

Sanding down the top revealed more layers of colors.

Lots of pink under the brown on the drawers.  Filled the holes from the previous drawer pulls.

A couple of layers of paint and lots of sanding with the orbital sander; purposely revealing some of the old pink and yellow paint on the top.

The side with the damage on the right; the good side on the left.

Good (right) and bad (left) sides again; but in better light.  My ‘repair’ job IS noticeable, but not very!  Most of the time, you don’t even SEE the sides of a chest when it’s in use in a home anyhow.

Found the perfect vintage drawer pulls for this piece.

Available for purchase in my booth at Stars.